P-11: Tap (the Signal Relay Is Closed, and the Signal Disappears. the Relay Stops)
P-12: Self-Locking (Suction for One Signal Relay and Stop for Another Signal Relay)
P-13: the Relay Automatically Stops for a Second When the Signal Is Sent. the Trigger Is Invalid during the Delay Period.
P-14: When the Signal Is Sent, the Relay Will Automatically Stop after a Second of Suction. during the Delay Period, the Re-Timing Is Triggered.
P-15: When the Signal Is Sent, the Relay Automatically Stops for a Second; the Superposition Timing Is Triggered during the Delay Period.
P-16: When the Signal Is Sent, the Relay Will Automatically Stop for a Second. Reset Is Triggered during the Delay Period.
P-17: the Signal Is Given, the Relay Is Closed, the Input Signal Is Disconnected, the Power Is Cut off after the Timing Starts for a Second, the Signal Is Kept Output Again during the Delay Period, and the Timing Stops.
P-18: after Power on, the Relay Is Immediately Closed, and Power off after a Second Delay; until the next Power on
P-21: Give the Signal. after a Second Delay, the Relay Is Closed.
P-22: Give the Signal. after More than a Second, the Relay Is Closed, the Signal Disappears, and the Relay Stops.
P-23: after the Signal Disappears for More than a Second, the Relay Is Closed. If There Is a Signal, the Relay Stops.
P-24: after the Signal Exceeds a Second, the Relay Is Closed. after the Signal Disappears for More than a Second, the Relay Stops.
P-25: after the Signal Exceeds a Second, the Relay Is Closed. after the Signal Exceeds a Second, the Relay Stops.
P-26: the Signal Relay Stops after a Second of Suction, and the Signal Disappears. the Relay Stops after a Second of Suction.
P-27: the Pulse Signal Is Detected, and the Relay Stops; There Is No Pulse Signal, and the Relay Is Delayed for a Second; (the Signal Continues Or the Signal Disappears as No Pulse Signal)
P-28: after Power on, after a Second Delay, the Relay Is Closed until Power off
P-31: after Power on, the Relay Is Closed for a Second, Disconnected for B Seconds, Infinite Cycle; Power off Stops
P-32: If There Is a Signal, Start P-31 Infinite Loop; the Signal Disappears and Ends the Loop.
P-33: Give a Signal, Start P-31 Infinite Loop; Give Another Signal to Terminate the Loop
P-34: after Power-on, after a Second Delay, the Relay Is Closed and Stopped after B Seconds.
P-35: There Is a Signal. after a Second Delay, the Relay Is Closed and Stopped after B Seconds.
P-36: There Is a Signal. after More than a Second, the Relay Is Closed and Stopped after B Seconds. the Signal Disappears and the Timing Is Cleared and Stopped.
P-37: If There Is a Signal, the Relay Will Automatically Stop for a Second. after Stopping, It Will Be Timed for B Seconds. the Signal Trigger Is Invalid Within a B Time.
P-38: If There Is a Signal, the Relay Will Automatically Stop in a Second. after Stopping and Timing for B Seconds, the Relay Will Automatically Stop in a Second.
P-41: the Signal Does Not Act; the Signal Disappears and Triggers; the Relay Is Disconnected after a Time Delay
P-42: the Signal Disappears. after the Delay Time a, the Relay Works; the Working Time B Ends.
P-43: after the Signal Disappears for More than a Time, the Relay Works; the Working Time B Ends.
P-44: after Power on, the Relay Works for a Time and Stops for B Time; the Cycle Stops Automatically for C Times.
P-45: Power on without Action, after the Signal Is Given; the Relay Works for a Time, Stops for B Time; the Cycle Stops Automatically for C Times; Give the Signal Again and Execute It Again
P-46: after the Signal Is Sent More than a Times, the Relay Is Closed; Keep the Suction; Power off and Stop
P-47: after the Signal Is Sent More than a Times, the Relay Stops for B Seconds.
P-48: in C Seconds, after the Continuous Signal Exceeds a, the Relay Stops for B Seconds.
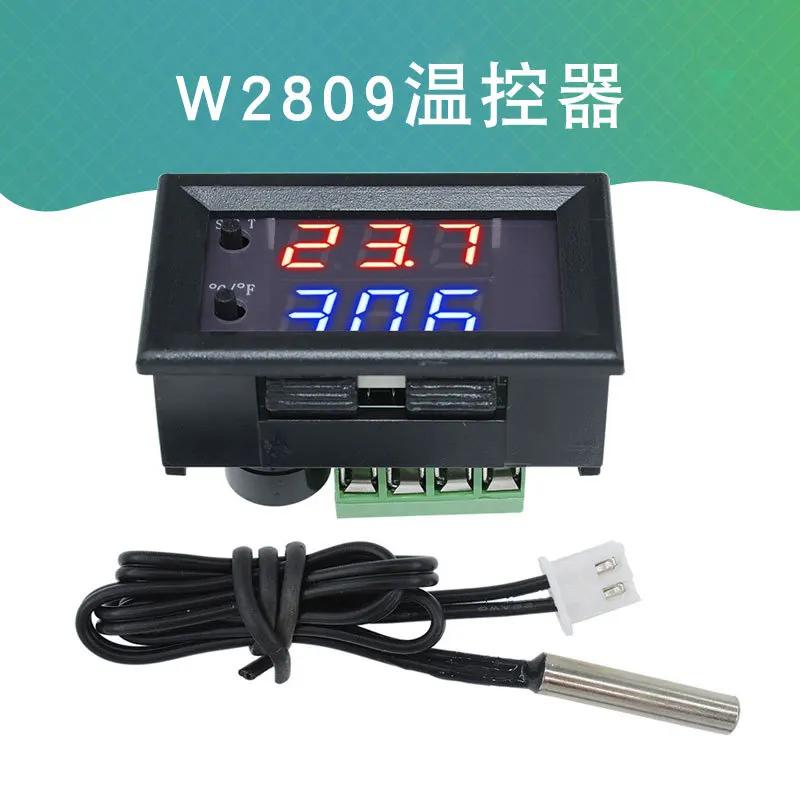
7: Button Setting Description: Power-on Display ---- Indicates That the Standby State Is Entered;
Press K1 for the First Time (It Takes More than 1 Second to Be Effective to Prevent False Triggering) Display: P -11:K2 Adjust the Main Mode, K3k4 Adjust Function
Press K1 for the Second Time, and the Screen Display: A001:K2 and K3 Adjust the First Time a, and K4 Adjust the Decimal Point (Time Unit)
Press K1 for the Third Time, and the Screen Display: B001:K2 and K3 Adjust the Second Time B, and K4 Adjust the Decimal Point (Time Unit)
Press K1 for the Fourth Time, and "----" Is Displayed to Indicate That the Standby State Is Entered.
Press K4 in Standby Mode to Permanently Turn off/on the Display and Switch the Low Power Consumption Mode.
8: Decimal Point Time Unit Description:
X. Xx Decimal Point Is 100, Timing Range: 0.01 Seconds to 9.99 Seconds
X X.x Decimal Point Is Ten, Timing Range: 0.1 Seconds to 99.9 Seconds
Xxx Has No Decimal Point, Timing Range: 1 Second to 999 Seconds
Xxx. the Decimal Point Is in One Digit, and the Timing Range Is 1 Minute to 999 Minutes.
9: Common Wiring Diagram:


 배송기간
배송기간